
(updated 7/30/01)
You can measure many cells fairly well using relatively simple equipment. You will need a digital voltmeter, some power resistors, and a switch rated for the current you want to deal with. I would not mess with more than 5 amps this way. Don't expect to measure low resistance, high-current cells this way. This requires lots of power dissipation, really good connections, and an understanding of how to account for test equipment losses.
The measurement concept is simple. We pretend that a cell can be modelled as an ideal voltage source and an ideal resistor in series. The source can supply any amount of current with no change in voltage. The resistor does not change value with time, current, or power dissipated. What happens in real life is that for the first few percent of capacity off of charge, the voltage is high. Then it is fairly constant for most of the discharge, finally dropping rapidly. The resistance varies modestly during discharge until near the end when it rises dramatically. For modelling purposes, we want the average of the 'plateau' in the middle.
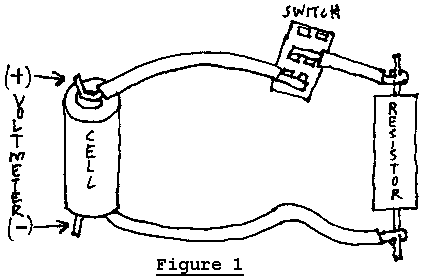
We will use a setup as shown in Figure 1.
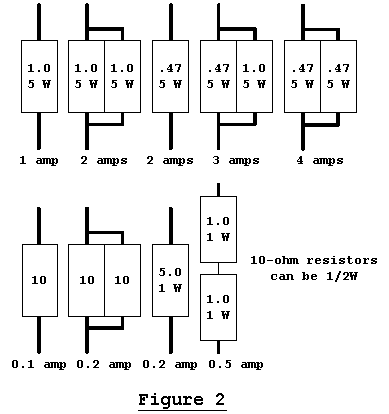
It consists of the cell to be tested, a DPST or DPDT switch, and a power resistor. It is best to solder wires directly to the cell. I would leave some extra wire to attach voltmeter leads to. If you want to, you can attach a 2nd set of wires with banana plugs to plug directly into the meter. These don't have to carry significant current. Keep all other wiring as short as practical and use comparable size to what you would use in your plane. I prefer at least a 5A switch with contacts wired in parallel. A decent switch has less than a milliohm resistance. The power resistor must be chosen as appropriate for your application. A guideline is to figure how much time you expect the cell to last in flight and double this time. Take the stated or estimated milliampere-hour rating, multiply by sixty, then divide by the number of minutes you figured above. Typically this will be a current of 3-6 times the mah rating. For example, if you want to test a 500 mah cell that you figure should give me a full-power 5-minute flight, assume a 10-minute test.
There are a lot of numbers to write down and calculations to make. You can print out some data sheets and/or download a spreadsheet to help with this process. Just use the buttons below:
You will gather data about every 30 seconds and record it in 3 columns. Each time you reach a multiple of 30 seconds write down (or briefly remember) the voltmeter reading. Then open the switch and remember the reading. Then close the switch and remember the reading. Write them down. Repeat. We are looking at Load/No-Load/Load. We could do without the 3rd reading but the idea is that you are basically estimating the midpoint to compare with the open reading which should be midway in time between the other readings. Write down each number to 3 decimal places. It may seem like a lot to do, but it should only take a few seconds. You should spend 1-2 seconds in the off position, just enough time for the reading to somewhat settle. Quit when the middle (no-load) reading is below 1.0V. If all this seems like too much work, you can just take some readings midway through the discharge cycle. Taking a bunch of readings tends to average out variations in readings, and provides a picture of the whole curve. If you choose to use the spreadsheet, transfer the readings to the appropriate columns. Otherwise, perform the math shown.
Now throw out about 20% of the readings on either end. If you took 20 readings over 10 minutes, throw out the frist four and last four readings. In the spreadsheet, change the '1' entry to a '0' for the data you do not want to use. If you're hand cranking numbers, Take the average value of R and the average value of V2. The spreadsheet will do that automatically when you set the '0's. Milliamp-hours can be estimated by adding up all the V4 calculations and multiplying by 7.78. You can use these numbers in the database. Either weigh and measure some cells or get the data from a catalog or web site.
Whew! I'm glad I have computer-controlled meters and load!